Marker Tracker
| Related documentations |
|---|
| Marker |
| Tracker Coordinate System in Unity |
Make Marker Tracker Scene
Set Target Marker
Start / Stop Tracker
Use Tracking Information
Change Tracking Mode
By recognizing and tracking the provided markers, you can augment images, 3D objects or videos especially when there are plenty of targets. 8,192 markers will be provided which were developed by MAXST itself.
Make Marker Tracker Scene
Create the new scene.
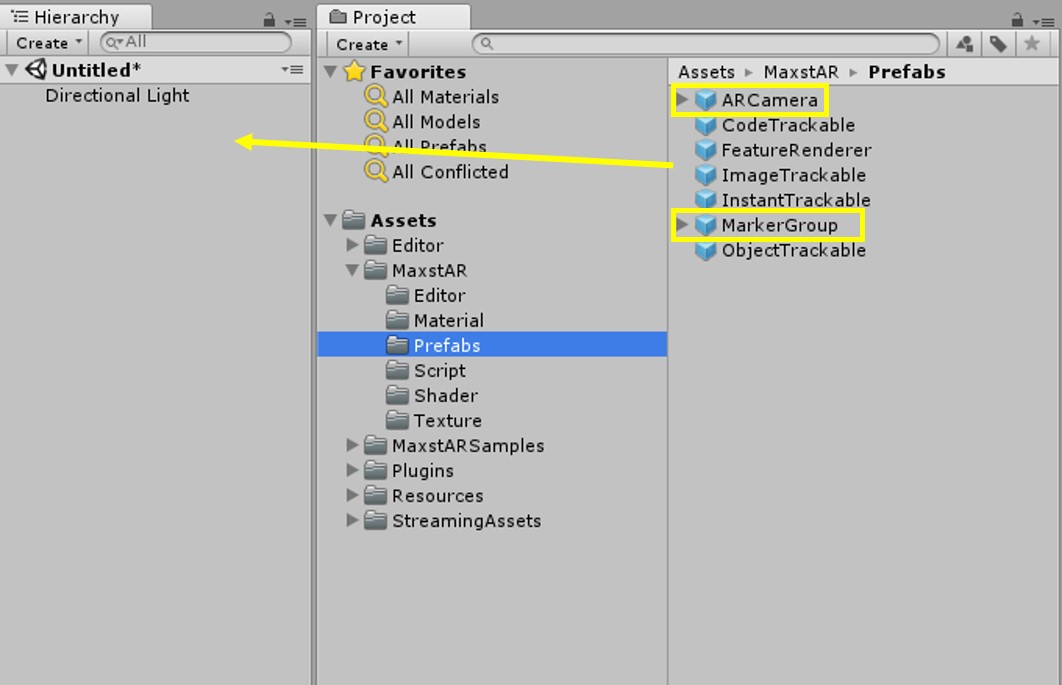
Delete the Main Camera(default) and add MarkerGroup at ‘Project Tab > Assets > MaxstAR > Prefabs > ARCamera, MarkerGroup’ to the Scene.

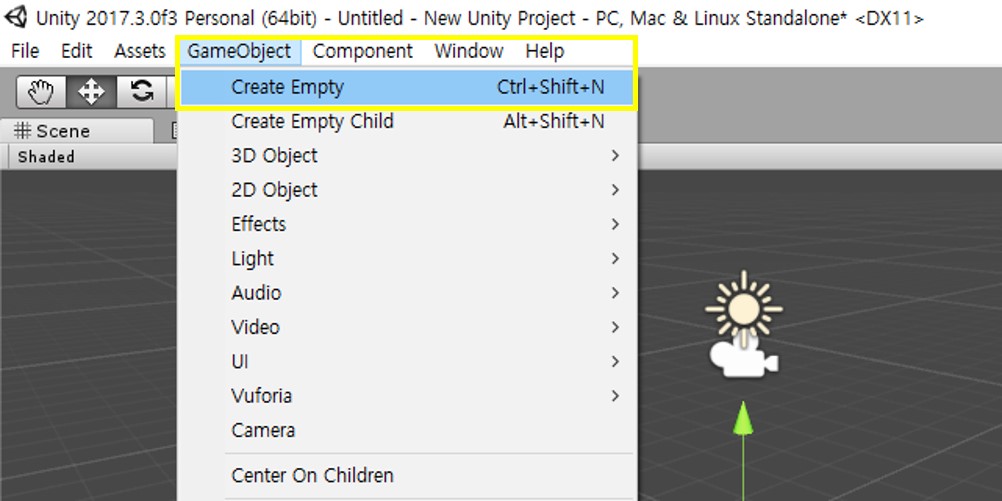
Create an empty object and add 'Assets > MaxstARSamples > Scripts > MarkerTrackerSample’ as a component.

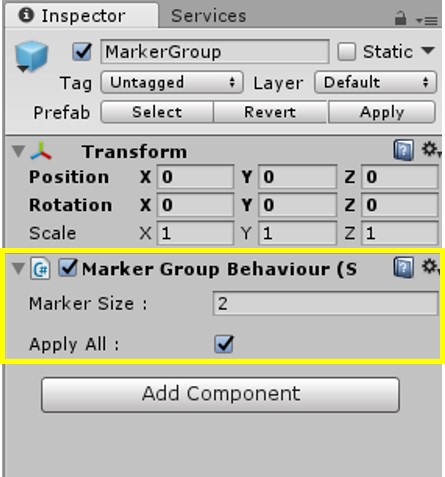
Go to 'MarkerGroup > Inspector > Marker Size' and input the size of the actual marker in meters. If the marker size is 10cm, enter 0.1(If the markers' size is various, uncheck 'Apply All' under Marker Size and enter each size at MarkerTrackable).

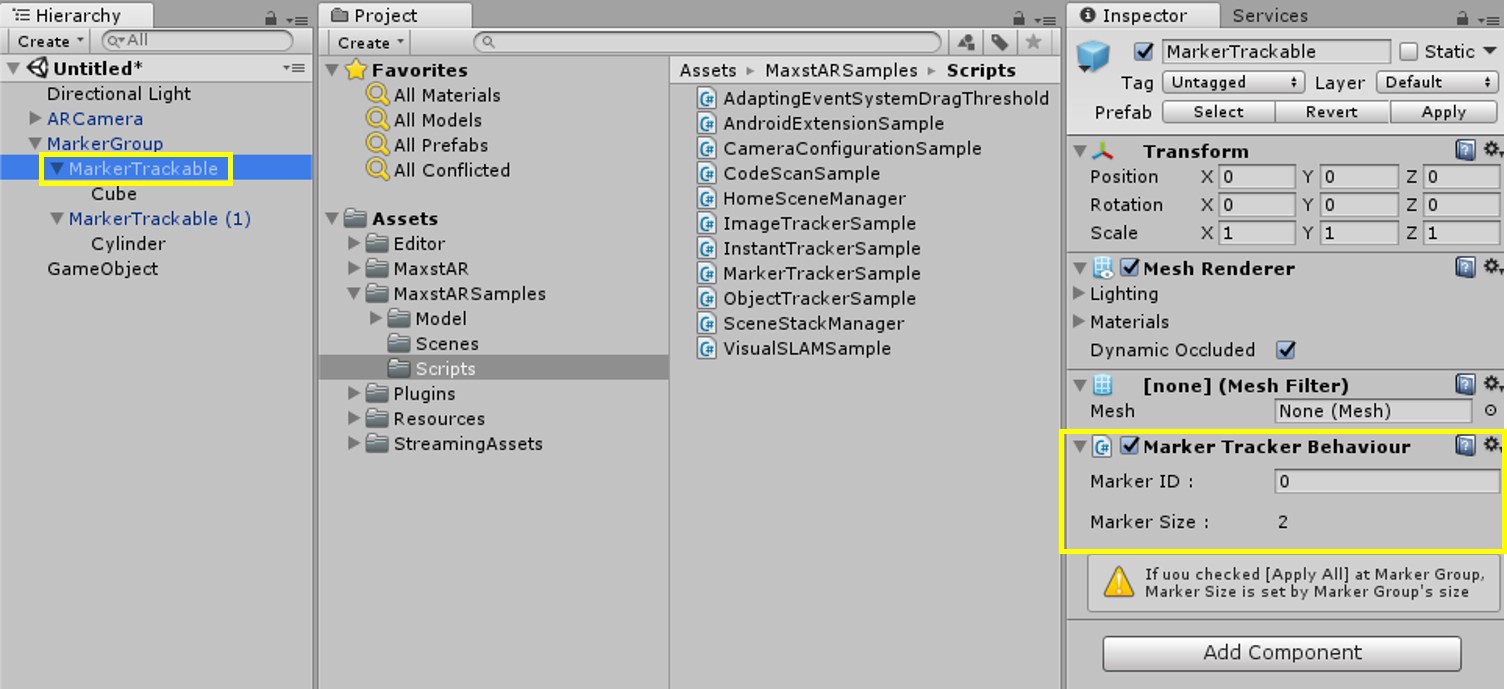
Copy the MarkerTrackable to the MarkerGroup as many markers as it is used in the AR. Then enter the Marker ID(0~8191) for each MarkerTrackable.

Create a content which will be augmented (eg. cube) as a child of ImageTrakable and adjust its size and position.
After clicking 'Play' button, the content will be augmented once you point the camera to the target marker.
*Target marker file is located at Marker.
Set Target Marker
Once you enter the target marker size (m) and call the addTrackerData, you can track the marker in real scale. Refer to the following code to set a target marker.
MarkerTrackerSample.cs
private void AddTrackerData()
	{
		foreach (var trackable in markerTrackableMap)
		{
			if (trackable.Value.TrackerDataFileName.Length == 0)
			{
				continue;
			}

									TrackerManager.GetInstance().AddTrackerData(trackable.Value.TrackerDataFileName);
		}

		TrackerManager.GetInstance().LoadTrackerData();
	}
Start / Stop Tracker
After setting the markers, refer to the following code to start / stop the tracker.
MarkerTrackerSample.cs
void Update()
	{
…
	TrackerManager.GetInstance().StartTracker(TrackerManager.TRACKER_TYPE_MARKER);
…
	}
	void OnApplicationPause(bool pause)
	{
	…
			TrackerManager.GetInstance().StopTracker();
	…
	}
	void OnDestroy()
	{
…
		TrackerManager.GetInstance().StopTracker();
		TrackerManager.GetInstance().DestroyTracker();
	…
}
Use Tracking Information
Refer to the following code to use the tracking information.
MarkerTrackerSample.cs
	void Update()
	{
	…
TrackingResult trackingResult = state.GetTrackingResult();

		for (int i = 0; i < trackingResult.GetCount(); i++)
		{
			Trackable trackable = trackingResult.GetTrackable(i);
          	  	int markerId = -1;
            		if (int.TryParse(trackable.GetName(), out markerId)) {
                			if (markerTrackableMap.ContainsKey(markerId))
                			{
                    			markerTrackableMap[markerId].OnTrackSuccess(
trackable.GetId(), trackable.GetName(), trackable.GetPose());
                			}
            		}
		}
	}
Change Tracking Mode
2 Tracking Modes of Marker Tracker:
JITTER_REDUCTION_ACTIVATION, JITTER_REDUCTION_DEACTIVATION
- JITTER_REDUCTION_ACTIVATION: Default Setting. Jitter reduction.
TrackerManager.GetInstance().SetTrackingOption(TrackerManager.TrackingOption.JITTER_REDUCTION_ACTIVATION);
- JITTER_REDUCTION_DEACTIVATION: Disable the jitter reduction option.
TrackerManager.GetInstance().SetTrackingOption(TrackerManager.TrackingOption.JITTER_REDUCTION_DEACTIVATION);


