Image Tracker
| Related documentations |
|---|
| Target Manager |
| Recommended Conditions for Target Images |
| Tracker Coordinate System in Unity |
The Image Fusion Tracker recognizes and tracks planar images. It can demonstrate not only 3D objects but also videos, even the transparent one.
After target recognition and initial poses are acquired through the MAXST SDK, use ARCore/ARKit for tracking.
※To use the AR Core / AR Kit, you must enter the actual size. (See Start / Stop Tracker)
The biggest difference from the existing Image Tracker is that the existing Image Tracker tracks through the frame input from the RGB camera. Due to the nature of RGB cameras, tracking will be lost if the target deviates from the camera frame or if there are few feature points. Image Fusion Tracker, on the other hand, tracks through the AR Core, which allows the target to deviate from the camera frame or keep the feature point at least without tracking, due to the nature of learning the environment in which the current target lies.
Make Image Fusion Tracker Scene
Set Target Image
Add / Replace Target Image
Train Target Image Instantly
Start / Stop Tracker
Use Tracking Information
Change Tracking Mode
GitHub Unity Scene Example
Make Image Fusion Tracker Scene
Create a new scene.
Delete the Main Camera that exists by default and add 'Assets > MaxstAR > Prefabs > ARCamera, ImageTrackable' to the scene.
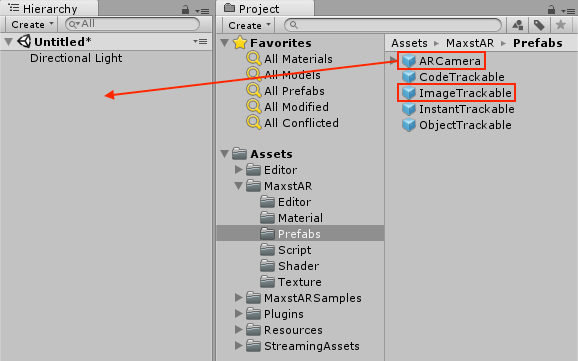
※ If you build, you should add License Key to ARCamera.
Create an empty object and add 'Assets > MaxstARSamples > Scripts > ImageTrackerSample' as a component.
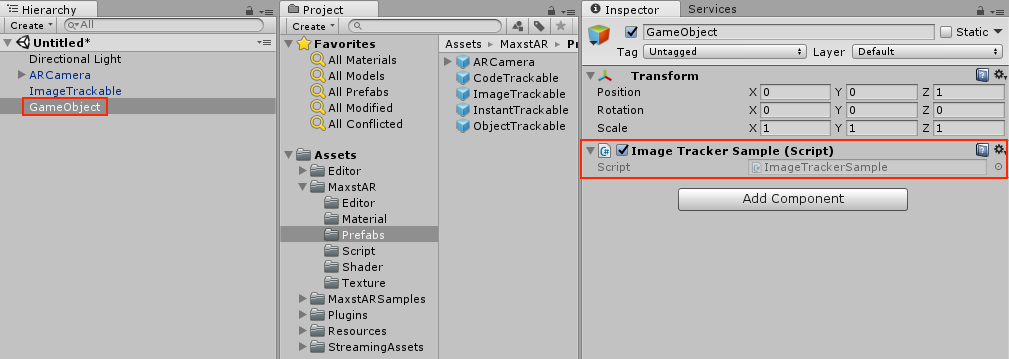
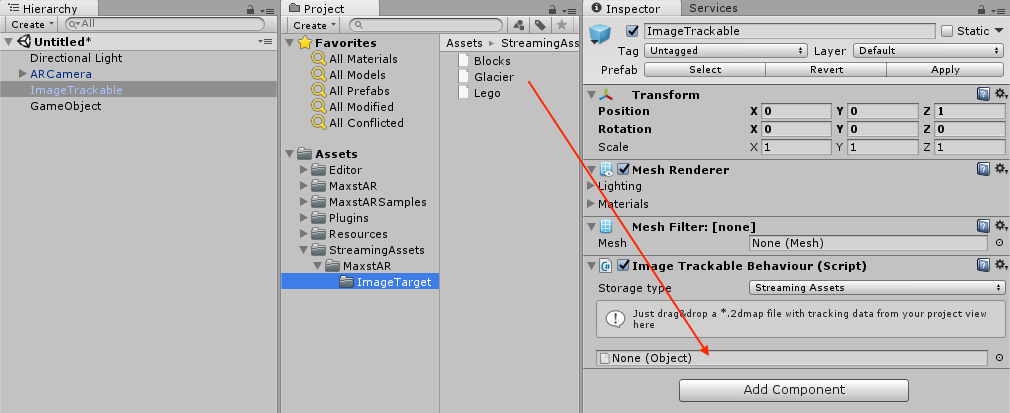
Drag a Assets > StreamingAssets > MaxstAR > ImageTarget > sample map file to the Inspector of ImageTrackable to set the map.
In the ImageTrackable's Inspector, drag and drop 'Assets > StreamingAssets > MaxstAR > Sample > Sample Map File'
Create a cube as a child of ImageTrakable and adjust its size and position.

The cube will be augmented by illuminating the target image to the camera after Play.
※ Target image file is located in 'Assets > Editor > MaxstAR > Textures > ImageTarget' folder.
Set Target Image
By calling addTrackerData () to register the map file and calling loadTrackerData (), target image can be tracked. To set a target image, refer to the following code.
>ImageFusionTrackerSample.cs
private void AddTrackerData()
{
    foreach (var trackable in imageTrackablesMap)
    {
        if (trackable.Value.TrackerDataFileName.Length == 0)
        {
            continue;
        }

        if (trackable.Value.StorageType == StorageType.AbsolutePath)
        {
            TrackerManager.GetInstance().AddTrackerData(trackable.Value.TrackerDataFileName);
        }
        else
        {
            if (Application.platform == RuntimePlatform.Android)
            {
                TrackerManager.GetInstance().AddTrackerData(trackable.Value.TrackerDataFileName, true);
            }
            else
            {
                TrackerManager.GetInstance().AddTrackerData(Application.streamingAssetsPath + "/" + trackable.Value.TrackerDataFileName);
            }
        }
    }

    TrackerManager.GetInstance().LoadTrackerData();
}
Add / Replace Target Image
Create a map file refer to Target Manager.
Download the file you created.
Import the downloaded file.
Train Target Image Instantly
If you want to use a raw image file as an image target without an offline training process via Target Manager, enter a JSON object as the first parameter of AddTrackerData().
A sample JSON format is like below.
{
    "image":"add_image",
    "image_path":"ImageTarget/Blocks.png",
    "image_width":0.26,
}
The "image":"add_image" pair should be located at first. The value of "image_path" is an image path and the value of "image_width" is a real width (meter unit) of an image target.
A sample code is like below.
TrackerManager.GetInstance().AddTrackerData("{\"image\":\"add_image\",\"image_path\":\"ImageTarget/Blocks.png\",\"image_width\":0.26}", true);
When copying to the assets folder, set the second parameter to true to indicate that it is a relative path and a file in the assets folder. If copying to external storage, enter the full path and set the second parameter to false.
The instant training permits only jpg and png formats. An image width as a pixel size should be more than 320 and the best is 640.
※ Instant training of an image takes twice as much time as loading a 2dmap.
※ You must call LoadTrackerData () after calling AddTrackerData ().
Start / Stop Tracker
TrackerManager.getInstance().IsFusionSupported ();
This function checks whether or not your device supports Fusion.
Return value is bool type. If true, it supports the device in use. If it is false, it does not support the device.
TrackerManager.getInstance().GetFusionTrackingState ();
Pass the tracking status of the current Fusion.
The return value is an int of -1, which means that tracking isn't working properly, and 1 means that it's working properly.
After loading the map, refer to the following code to start / stop the tracker.
>ImageFusionTrackerSample.cs
void Start()
{
    ...
    CameraDevice.GetInstance().SetARCoreTexture();
TrackerManager.GetInstance().StartTracker(TrackerManager.TRACKER_TYPE_IMAGE_FUSION);
    ...
}

void OnApplicationPause(bool pause)
{
    ...
    TrackerManager.GetInstance().StopTracker();
    ...
}

void OnDestroy()
{
    ...
    TrackerManager.GetInstance().StopTracker();
    TrackerManager.GetInstance().DestroyTracker();
}
When creating a 2dmap, the actual size must be entered correctly. (Unit: m)
You must enter the actual size of the target. If you do not enter the correct actual size, the content will not be augmented properly.
It must be run in the following order: startTracker (), addTrackerData (), loadTrackerData ().
Use Tracking Information
Refer to the following code to use the tracking information.
>ImageFusionTrackerSample.cs
void Update()
{
    ...
    TrackingState state = TrackerManager.GetInstance().UpdateTrackingState();
    TrackingResult trackingResult = state.GetTrackingResult();

    for (int i = 0; i < trackingResult.GetCount(); i++)
    {
        Trackable trackable = trackingResult.GetTrackable(i);
        imageTrackablesMap[trackable.GetName()].OnTrackSuccess(trackable.GetId(), trackable.GetName(), trackable.GetPose());
    }
}
GitHub Unity Scene Example
GitHub Unity Scene Example: https://github.com/maxstdev/MaxstARSDK_Unity_Sample.git
- ExtraImageTrackerKnight
- ExtraImageTrackerMultiTarget