Object Tracker
The Object Tracker loads the map file and renders 3D object on it.
Configuring the Object Tracker Scene
Setting a Map
Adding / Replacing a Map
Starting / Stopping the Tracker
Using the Tracking Information
Configuring the Object Tracker Scene
Create a new scene.
Delete the Main Camera that exists by default and add 'Assets > MaxstAR > Prefabs > ARCamera, ObjectTrackable' to the scene.
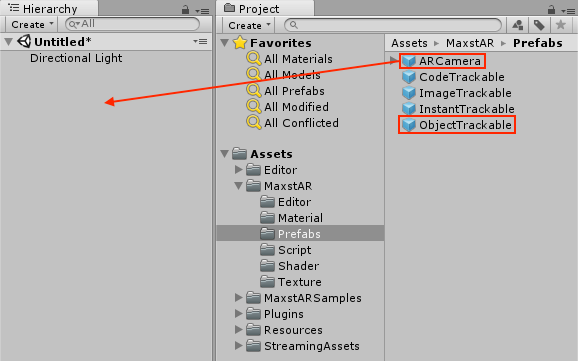
※ If you build, you should add License Key to ARCamera.
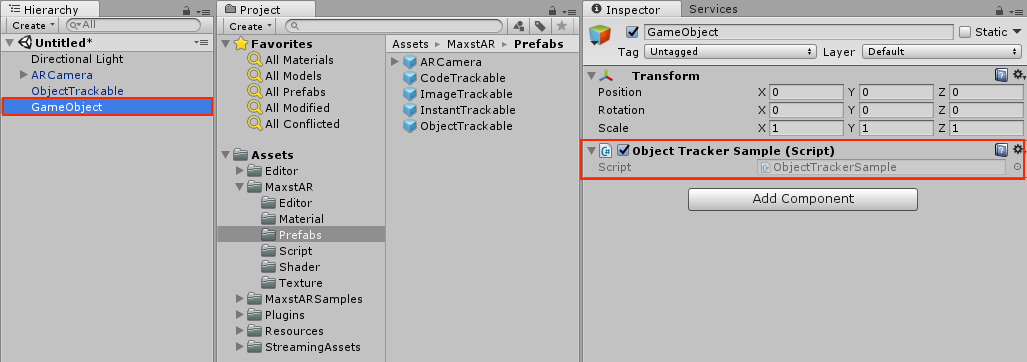
Create an empty object and add 'Assets > MaxstARSamples > Scripts > ObjetTrackerSample' as a component.
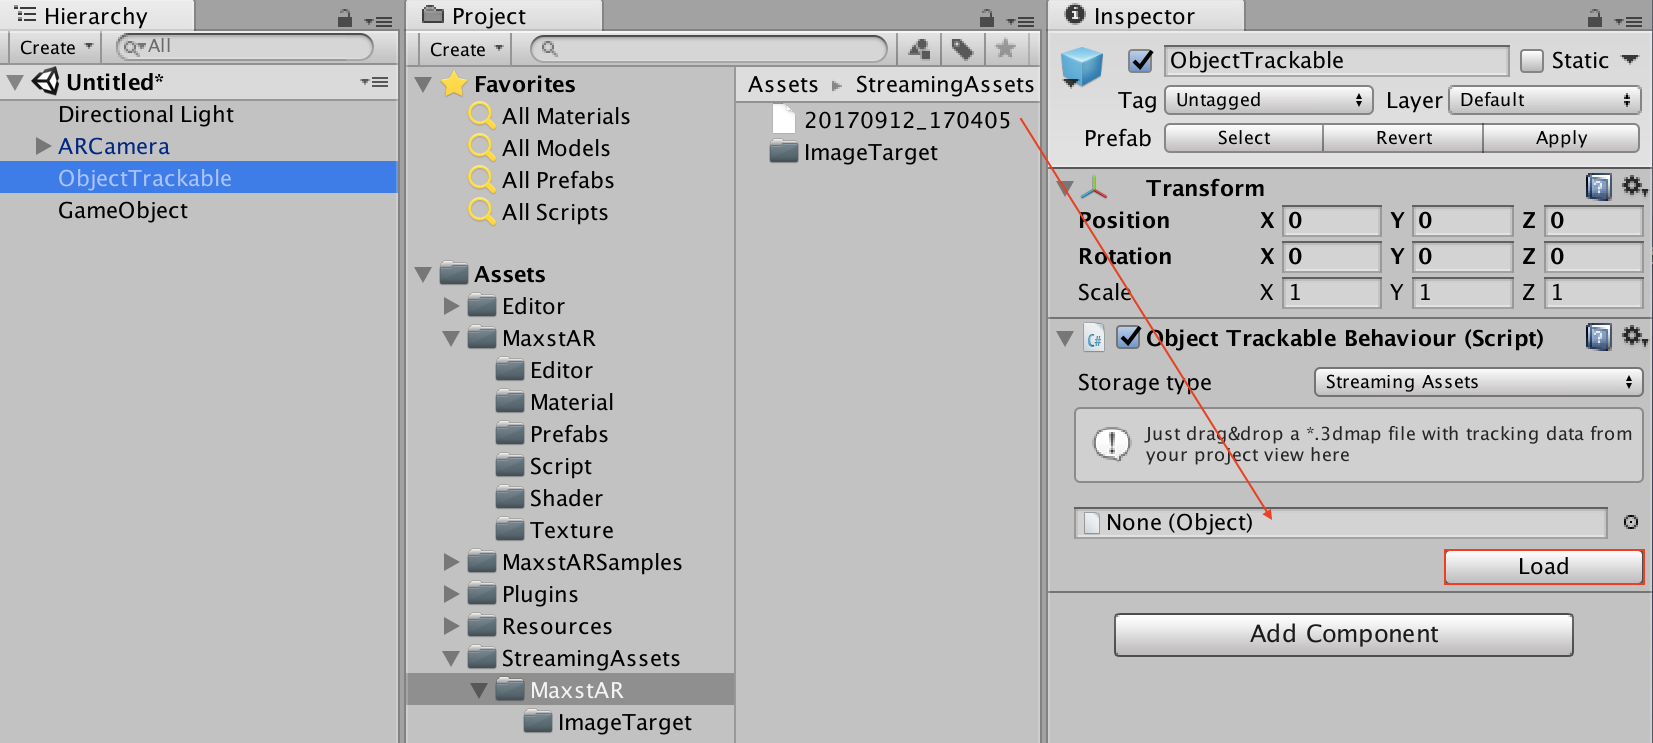
Place the map file created by Visual SLAM scene or Documentation > Map Manager in Assets > StreamingAssets > MaxstAR, and drag map file to Inspector of ObjectTrackable to set map file. Press the Load button to set the map in the map viewer described later.
Create a Cube as a child of ObjectTrakable.

In MapViewer's Inspector, check Generate Mesh, Transparent, and adjust the scale and position of the cube.
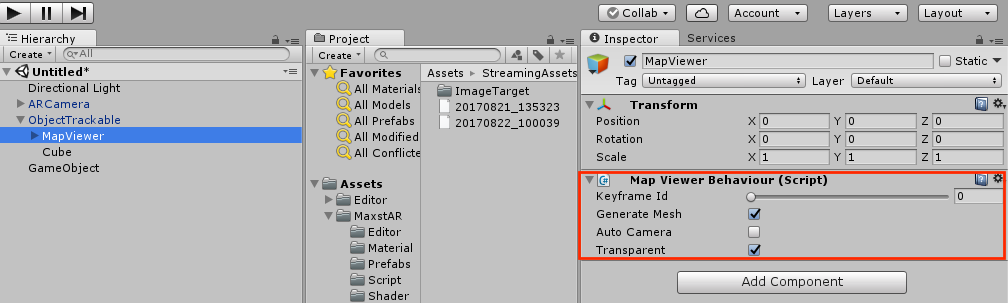
※ MapViewer
If you set a map file in ObjectTrackable, MapViewer is automatically created as child of ObjectTrackable.
Keyframe Id: When creating a map, the camera looks at the target in various directions. At this time, a Keyframe is created for each direction that satisfies a certain condition. If you change Keyframe Id, Mesh / Image of the Keyframe is displayed in Game View. By positioning Cube in each Keyframe, you can position Cube more precisely.
Generate Mesh: If checked, the image displayed in the Game View changes to Mesh.
Auto Camera: If checked, the Keyframe closest to the screen of Scene View is automatically selected.
Transparent: If checked, Mesh / Image becomes transparent.
The cube will be augmented by illuminating the space learned in the camera after playing.
Setting a Map
By calling addTrackerData () to register the map file and calling loadTrackerData (), Space can be tracked. To set a map, refer to the following code.
>ObjectTrackerSample.cs
private void AddTrackerData()
{
    foreach (var trackable in objectTrackablesMap)
    {
        if (trackable.Value.TrackerDataFileName.Length == 0)
        {
            continue;
        }

        if (trackable.Value.StorageType == StorageType.AbsolutePath)
        {
            TrackerManager.GetInstance().AddTrackerData(trackable.Value.TrackerDataFileName);
        }
        else
        {
            if (Application.platform == RuntimePlatform.Android)
            {
                TrackerManager.GetInstance().AddTrackerData(trackable.Value.TrackerDataFileName, true);
            }
            else
            {
                TrackerManager.GetInstance().AddTrackerData(Application.streamingAssetsPath + "/" + trackable.Value.TrackerDataFileName);
            }
        }
    }

    TrackerManager.GetInstance().LoadTrackerData();
}
Adding / Replacing a Map
Create a map file refer to Documentation > Map Manager.
Copy the received map file to the desired path.
If you have an existing map file, call AddTrackerData () and LoadTrackerData () after calling TrackerManager.GetInstance ().RemoveTrackerData().
Starting / Stopping the Tracker
To start / stop Tracker after loading the map, refer to the following code.
>ObjectTrackerSample.cs
void Update()
{
    ...
    if (!startTrackerDone)
    {
        TrackerManager.GetInstance().StartTracker(TrackerManager.TRACKER_TYPE_OBJECT);
        ...
    }
    ...
}

void OnApplicationPause(bool pause)
{
    ...
    TrackerManager.GetInstance().StopTracker();
    ...
}

void OnDestroy()
{
    TrackerManager.GetInstance().StopTracker();
    TrackerManager.GetInstance().DestroyTracker();
    ...
}
Using the Tracking Information
To use the Tracking information, refer to the following code.
>ObjectTrackerSample.cs
void Update()
{
    ...
    TrackingState state = TrackerManager.GetInstance().UpdateTrackingState();
    TrackingResult trackingResult = state.GetTrackingResult();

    for (int i = 0; i < trackingResult.GetCount(); i++)
    {
        Trackable trackable = trackingResult.GetTrackable(i);

        if (!objectTrackablesMap.ContainsKey(trackable.GetName()))
        {
            return;
        }

        objectTrackablesMap[trackable.GetName()].OnTrackSuccess(trackable.GetId(), trackable.GetName(), trackable.GetPose());
    }
}